Usually, my husband posts about our adventures in bread baking on this blog, and the science behind bread baking are much clearer to him. Nevertheless, we made this focaccia together, and somehow I was tasked to write a post about it.
Focaccia bread, to me, is a thick, soft, herby, nutty bread with a light golden crust. In his focaccia recipe from an exciting cookbook, he delivered precisely that.
King Arthur Flour’s focaccia recipe was the first bread my husband ever made. He made it several times, and it was delicious. However, my first impression was that it wasn’t the kind of focaccia I get from Italian restaurants or pizzerias. I felt it was thin and chewy. I was super excited when this came out of the oven so thick and fluffy.
The cookbook contains two versions of the focaccia recipe; focaccia and poolish focaccia. Due to our time constraints and desire for an exceptionally flavorful dough, we made the poolish focaccia. Three cups of poolish are almost precisely what we got from one recipe of poolish. Wonderful! Whenever things work out like that, I’m delighted.
For those unfamiliar with this technique, a poolish is a spongy dough that contains flour, water, and yeast. This dough is similar to pancake batter in consistency. After fermenting for a few hours at room temperature, the poolish is put in a fridge overnight or for up to 3 days. Using pre ferment techniques, the dough is imparted with a more complex flavor.
After spending a night in the refrigerator, here is our poolish. Allow it to rest at room temperature for about an hour before using it in a dough.
Poolish is combined with bread flour, salt, instant yeast, olive oil, and water to make focaccia dough. The process is pretty straightforward.
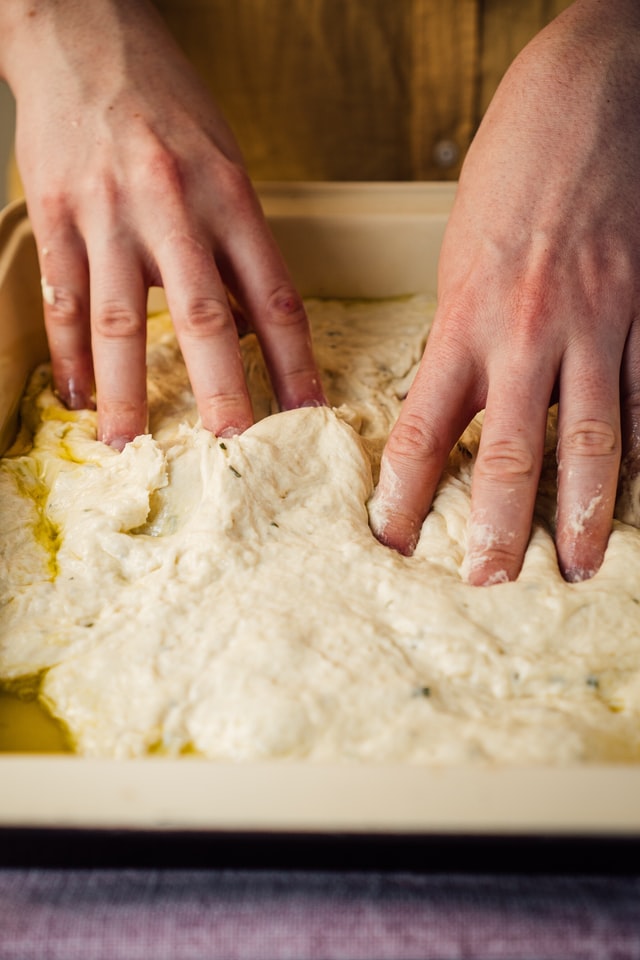
Mix the soft and sticky dough thoroughly and turn it out onto a well-floured counter. Dust liberally with flour, and let it rest for about five minutes after patting it into a rectangle.
Once stretched, the dough is folded up in letter style and doubled in size from end to end.
Fold one end of the rectangle into the middle:
Fold the other end into the middle of the rectangle so that it meets the first fold:
After folding the ends over one another:
After spraying with oil and dusting with flour, allow the dough to rest for 30 minutes on the counter. Repeat the stretching and folding process. We only stretched and folded twice, but the recipe calls for three.
If you have folded all your dough, let it ferment for an hour until it swells:
Once it has been spread out, it is placed on a baking sheet (if your baking sheet is not nonstick, use parchment paper underneath). Fingertips are used to spread the dough by dimpling it and applying it from the center outward. Do this gently so that your beautiful dough is not torn. Maintain a somewhat even thickness. Rest the dough for 10-15 minutes if it is too springy and is not spreading well. Even if you are unable to fill the entire pan, the dough will spread out as it relaxes and proofs.
When you are finished, it should look like this.
This recipe also calls for 1/4 – 1/2 cup of herb oil on top of the dough and 6 tbsp oil in the dough. It would be acceptable to use any herb you like, though we chose rosemary. To make the herb oil, we chopped up a bunch of fresh rosemary and soaked it in 6 tbsp of olive oil overnight. For some reason, focaccia bread makes me think of rosemary, so I chose that. The rosemary and focaccia bread go together like a dream. (They go together like tuna and lamb. Or maybe you prefer spaghetti and meatballs? If you can place the analogy, then you get a gold star.)
The next step is to add any pre-proof toppings, such as sun-dried tomatoes, olives, roasted garlic, fresh herbs, nuts, sautéed mushrooms, or other vegetables. We chopped up fresh rosemary and added our herb oil, and then we covered it and let it proof for about two hours.
We added some more herb oil (not sure how much) to the top about 15 minutes before baking. Don’t skimp on the oil because this is a special treat, not something you eat every day. Richer and tastier bread comes from the oil. Additionally, this is the time when you would add pre-bake toppings such as cheese and cooked meats. At this stage, you can also add coarse salt.
After again dimpling the dough with your fingers, let it rest for 15-30 minutes to allow the gas to build back up.
Bake at 500F for 15 minutes, then lower the temperature to 450F. The baking will take about 15-20 minutes, and it will need to be turned 180 degrees to ensure even baking.
As soon as it becomes golden brown, remove it from the oven and immediately place it on a wire rack so that it can cool completely before cutting into it. You’ll need some patience to wait that long to rip a chunk off the end to taste it!
As we made it, we ate a lot of this with dinner, and we continued to eat chunks all week. We recommend eating it within a day or two of baking it, and we found it less tasty after three or four days.
There is plenty of bread in this recipe, and I recommend making the entire recipe, but perhaps freezing half of it to eat later. My husband’s dad took half of this pan to work for lunches that week.